

You’re in an early-stage hardware startup with a product design set to shake up the market. Not sure how to turn your idea into a product? Here’s a step-by-step guide to the product development journey.
From the initial design sketched out on paper to the final product in your hand, every decision counts. This article will help you avoid costly mistakes and accelerate the process of bringing your product to market.
Instead of just listing the steps, I’ll explain the entire process through a case study of my motorized robot grip project. A gripper is what lets robots grab, hold, and shift stuff around.
The journey to create one includes steps like designing, prototyping, making the actual product, checking its quality, and of course, putting it to the test. But remember, making a product isn’t always a straight path.
For example, after designing, you will build a prototype. Feedback from that prototype might have you rethinking and tweaking your design. This cycle might repeat several times before reaching the final product.
1. Design
To turn your raw idea into a manufacturable design, you would require 3D CAD software like Fusion 360 or Solidworks. However, it’s not just about the software. Consider the functionality. For instance, ensuring precise motion means paying keen attention to tolerances. Too tight, and you risk excess friction or assembly difficulties. Too loose, and the movement might lack accuracy.
Always have your materials and manufacturing method at the forefront during this stage. If your product is for outdoor use, material expansion and contraction due to temperature changes should influence your tolerance decisions. You also need to consider the elements it may have to withstand to continue functioning properly.
2. Choosing Materials and Finishes
Select materials based on your project’s requirements. Given our need for mechanical movement, we chose aluminum that is both lightweight and strong to minimize inertia forces. Many robotic grippers also use titanium because of its robust mechanical properties. It is also worth considering factors such as resistance to corrosion and wear when thinking about durability.
Moving onto finishes, several factors come into play. Aesthetics matter, especially if the component is outward-facing. Additionally, the functional aspects of the finish can’t be ignored. In some cases, the components require a food-grade finish or need to be wear-resistant.
For my gripper, I went with “As Machined + Anodizing Type II” because it’s visually appealing. If you’re unsure about the ideal finish for your project, there’s an in-depth article on surface finishes that can guide you.
3. Prototyping
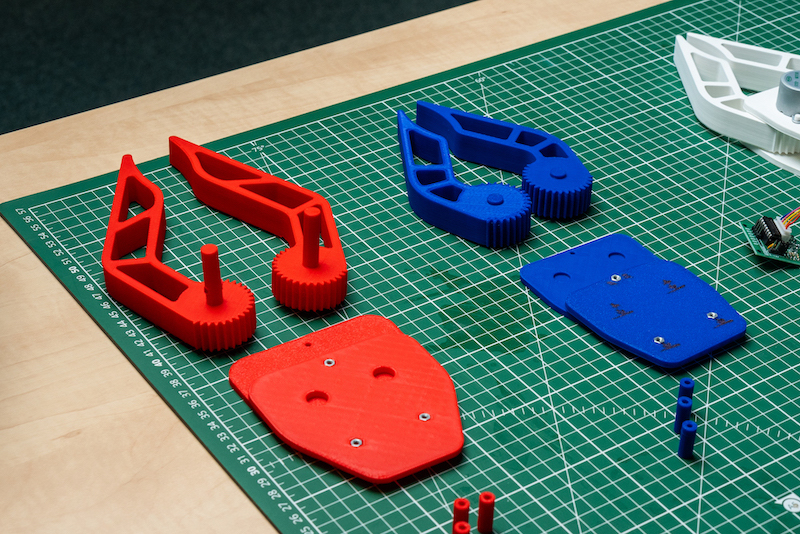
After the design phase, the next logical step is to create a prototype. A prototype is a preliminary version of the product with the purpose of testing and validating the design and function. The insights gained from prototyping often lead to design revisions. For clarity in the process, we have chosen different colors for each prototype.
The red prototype, our initial design, comes with an added feature beyond its core elements. This feature allows you to manually move the part, helping to verify if the gear’s distances and proportions support its motion.
For our second iteration, we introduced the blue prototype. We’ve enhanced its design to have improved proportions and more efficient material usage, which will help us save money in the final manufacturing. Given that the gripper is designed to be powered by an electric motor, we’ve eliminated the manual gear rotation mechanism.
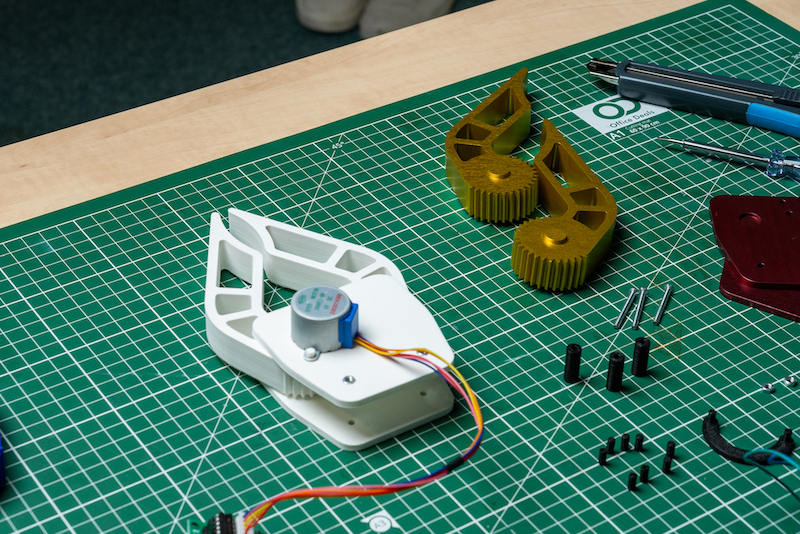
After revising the second prototype, we decided to move the supports in the plate in the third iteration. In this white assembly, we also added the pins to fit the electric motor, which is controlled by Arduino with the help of a simple code. After successfully validating the form and functionality of the third prototype, we move on to getting the part manufactured with the right materials.
4. Manufacturing
For producing metal parts, CNC remains the most popular manufacturing process in the market. While the adoption of metal 3D printing is increasing, it’s primarily viewed as ideal for intricate designs. Regardless, these manufacturing machines are expensive and require a skilled workforce. That’s why many startups and design studios opt to outsource the manufacturing process. You can find a local machining shop or use online manufacturing platforms like Hubs. We used Hubs’ network for our needs.
Once you upload the CAD file, Hubs provides instant quotes and DfM (Design for Manufacturability) feedback to optimize your design further. For our project, we opted for CNC machining with “as machined + anodization type II.” In terms of colors, we settled on red and gold. Why gold? Well, why not!
One great thing about using online manufacturing platforms is on-demand scalability. This means you can start with one item, and when the time is right, seamlessly move to mass production. The best part is that you can do all this without the burden of building or overseeing your own manufacturing facilities.

5. Quality Control
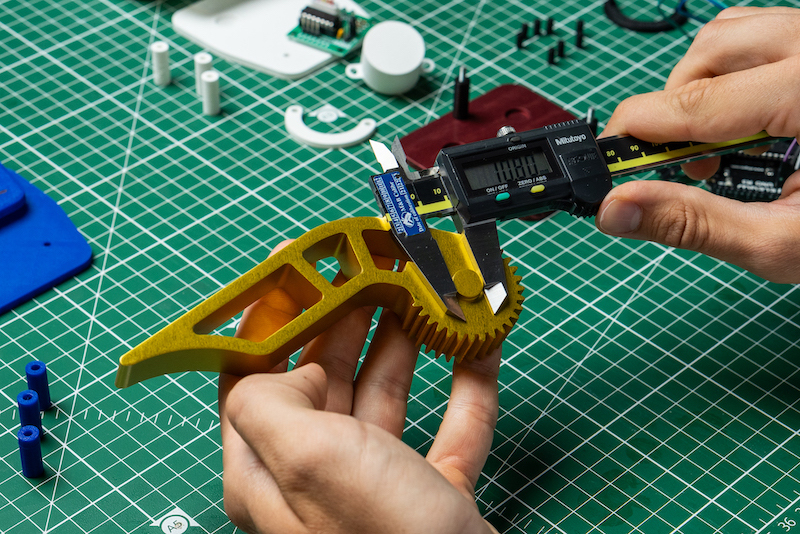
Upon receiving the parts, we recommend checking them thoroughly. The first step is a visual inspection, where you examine the part for scratches, dents, and the like.
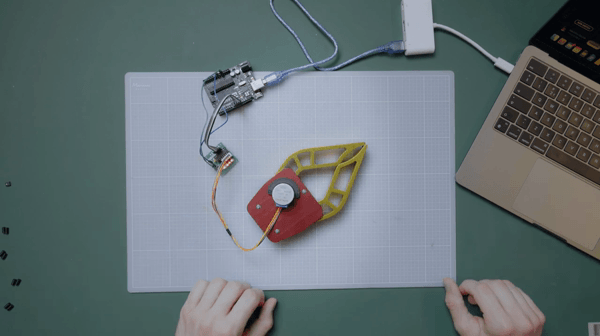
This is followed by verifying the specifications using specialized tools such as micrometers and height gauges. Finally, you’ll want to assemble the parts and conduct a functional test. Here, you can view the final assembly of my robot gripper, which is equipped with a motor.
For those interested in seeing it in action, you can watch this video (below): Making a Robotic Gripper (with motor) – From Design to Testing!
6. Certification and Compliance
Depending on your product and its region, you’ll need to tick off some essential certifications and compliance checks. This ensures that your product adheres to both legal and safety standards. Not only does this protect your customers, but it also helps your brand’s reputation. Like they say, it’s better to be safe now than sorry.
Getting into hardware product development for the first time isn’t easy, and while there’s no universal formula for success, using these steps as a guide will help you to sidestep common traps and fine-tune your approach.
Stay open to experimenting, and don’t let the possibility of failure slow you down. The best discoveries often lie just beyond the familiar paths.
Authors: Francesco Rivalta and Chandrakant Isi, Hubs
